Showing posts with label Tips. Show all posts

Thursday, March 15

Imperial vs Metric System - a simple conversion card -

Well, I'm not going to apologize for my blogging absence, moving and exams been crazy but that wasn't the reason I've not been blogging... I've been doing stuff and I have many projects in mind but again... I'm a perfectionist freak so I'll have to wait till I have perfect photos and stuff.

Recently, or let's say a month ago I entered the world of quilting, I don't know why I've not done it before, it looks so great. I already ordered a book on Amazon and I can't wait till it arrives.

Anyways, I noticed that in the Quilting zone everything is in inches, sigh, inches are not really that hard... what puzzles me are those fractions! So I made myself a conversion card, probably there are many around the web, I haven't checked because I was too excited in making my own.

So while I was looking up information, I found this site in Spanish, Como convertir medidas de pulgadas a centimetros y milimetros. That was my base to make my card and then I just used a calculator and ConvertWorld, I also added the conversion for yards to centimeters.

Here it is:
Inches to mm/cm

Polka Dot pattern is from a user in DeviantArt.
I still have to print it out to see if everything is fine, the card measures about 8x11 cm (about 3x4 inches :p)


So while doing this I couldn't help but to remember this graphic I saw a while ago about the Imperial (<- lol click if you wanna smile, cute geese!) system versus the metric system:

funny graphs - And We Have the Nerve to Call It the 'Standard System'
see more Funny Graphs

The imperial system doesn't make any sense to me but that might be just because I've used metric all my life and I also know it'd be reaaaally hard for a whole society to just change the system they have been using for decades, so that obvious thing being said I'll have to just get used to this new system with the help of my card and a calculator.
It's also a matter of use, for instance, 40, 60 and 80 inches are a meter, a meter and a half and 2 meters, easy to remember! The trick is when on patterns and books it says: 1 3/4 yard or 12 1/4'' and I have to rush to get my calculator to know what the heck it means  :/, I'm sure it wont be for long though, as I said, matter of practice.

Edit 16/03: So I woke up today and thought about inches again, I figured out by making this conversion card I'm translating, and I always tell people who are learning a new language to think in the new language and try NOT to translate all the time (kind of ironic on my side since I'm a translator -to be-).
It's hard to think in inches since I've never used that side of my measure tape before but if quilting requires it, and everybody uses it as a reference, I'll have to learn and practice and think in Imperial.


Photobucket

Monday, October 10

My trial & error at dyeing with kitchen products

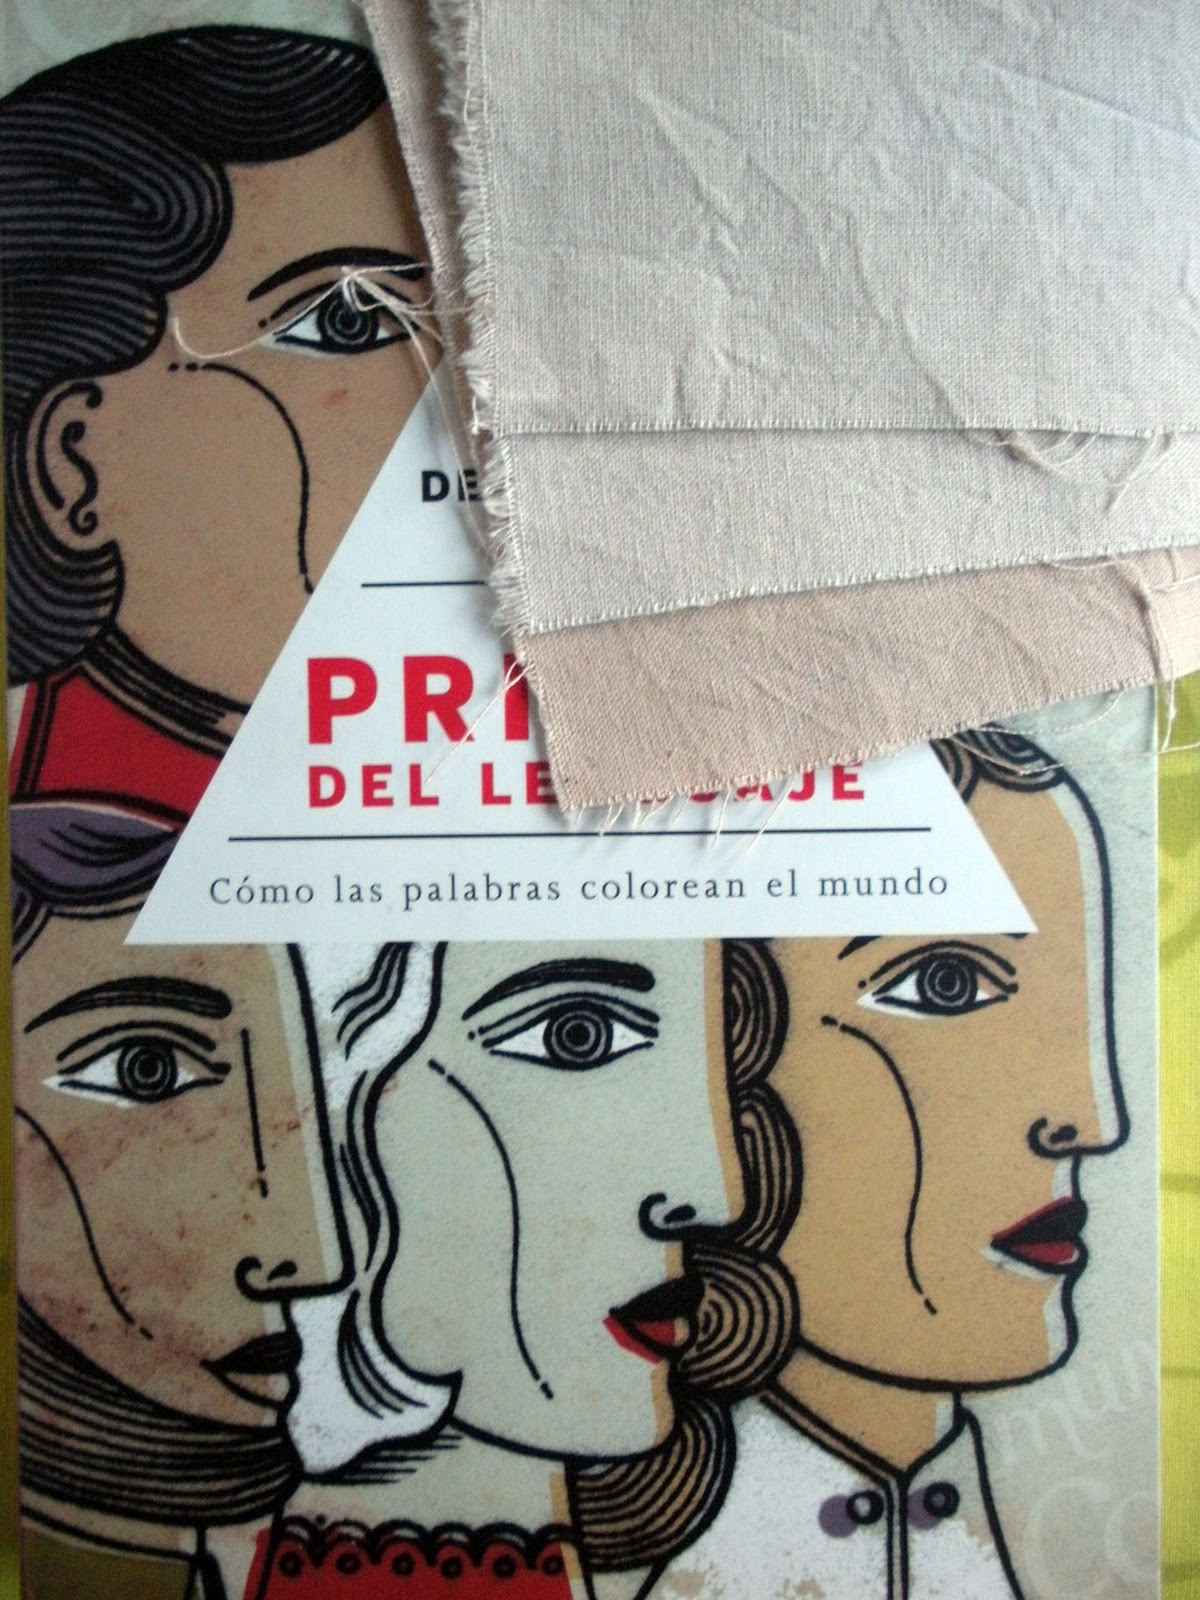
My first step for the Covered in Stitches Project I was talking about before was to find the right skin tones for the characters in my book cover.
To be honest I wasn't really sure I was going to find the right color in fabric, thanks to Mother Nature, last Saturday morning when I was about to head to the fabric store, it suddenly started to rain heavily and hail so I had to stay home and use my brain to figure out how was I going to get the project done, or more like start it without leaving my cozy and safe home.

This is the book and some white cotton fabric I had on stash. The skin tones didn't look so hard to achieve, I don't want them to be the exact same tone because it's impossible but a inspired one would be ok.
I've read around the web about dyeing with tea, coffee and spices, it looked like a great idea for a rainy day so I started with 3 cups, each for each swatch I cut:
I boiled water and after placing each of them in the cups, I soaked the swatches in cold water (don't know why but it seemed right to do so :p)
Trial 1
Pink Cup is full with a black tea bag and a tea spoon of coffee,
Green Cup is full with a tea bag,
Blue Cup is half full with a tea bag.
Time: 3 hours
Results:   All of them got the same tone, which is a nice one but I wanted it darker.

Trial 2
Again boiled water and rinsed each swatch before placing them in each cup.
Pink Cup is half full with 2 or 3 spoons of coffee, it's a granulated one.
Green Cup is empty, I liked the tone of trial 1.
Blue Cup is full with 2 tea bags
Time: all night
Results: very happy with the blue cup one, the pink one was promising but after I rinsed it, the color faded away and it went back to the original "green cup tone"
Results so far
Close to the skin tones, but one of the lighter swatches needs to be darker.
Trial 3 -trying something different, spices!-
Boiled water, filled a cup and a bowl, rinsed the lighter swatches (pink and green cup's) in:

Bowl: Added some paprika (pictured) and rubbed a little bit of tandori masala on the fabric.
Green Cup: Added spice for rice
Time: for the green cup, about an hour or 2 and all night and a little more for the bowl.
Results:  Stunning, I'm shocked at how the spice of rice dyes!, the result was a bright yellow, which is not handy for this project but it was nice to discover. However I'm happy with the Tandori Masala one, I thought it was going to wash off but it stained just as I wanted, very subtle, it comes handy for one of the character's skin.


 Since I couldn't lighten this bright yellow, I had to go back, cut another swatch and do trial 1 again, and these are all my home-dyed swatches:


And the final results! I'm happy with these skin tones I've achieved, I can't wait to embroider on them! 
One last tip: 
I've read that if you are dying garments or items like bags, you should add white vinegar or salt to the dye preparation so the color doesn't fade away, I don't think that'll be necessary for me since I'm making patches and embroider on them but it's a good tip.
More Colors!
· Making Natural Dyes from Plants: a very eye catching list of natural materials to dye with.
Español
En realidad no busque sitios, pero sin querer encontre este articulo sobre como obtener un color rosa con elementos naturales.
Photobucket

Tuesday, October 4

Cutting mat care tips from a beginner // Cuidados para plancha de corte de un principiante

 "Am I using this right?"... is the question that has been in my mind since I bought my self healing cutting mat.
Sometimes when I cut fabric, the cuts close with all the lint or fibers in it.
 I was worried about that so I had to google it up, turns out is kind of common and I found out many facts I didn't even know about, like, the mats love moisture or that they can be store under the mattress so they don't bend.
Here are some links:
· Care tips and other questions about cutting mats, Olfa cutting mats but I think it applies to almost every brand.
· An user review, very detailed and informative, I specially like when she says: "I make sure to run my hand over the cutting mat to brush any stray pieces of lint and fabric from the surface." That is my first instinct after I cut but I still see some fibers caught in there and that is starting to annoy me,

//Spanish break to translate, I've not seen much information about care and cleaning of cutting mats in my mother tongue so here comes my bit. Find the  (ah so cute) to keep reading where I left.//

¿Estoy usando esto bien?... me pregunto desde que compre mi plancha de corte (o llamada plancha de patchwork, base de corte o el nombre menos común, mesa de corte). Cada vez, o la mayoria de las veces cuando corto tela con el cortante circular en la plancha, quedan restos de tela en los cortes cuando se cierran, me preocupo eso asi que busque en internet.
 No sale mucho en español pero si en inglés, asi que este es mi granito de arena para otros inexpertos como yo que recien se inician en usar esta "nueva tecnologia".
 De este sitio donde hablan de los cuidados de las planchas Olfa pero que, yo creo, se pueden aplicar a todas las otras marcas, puedo resumir esto en cuanto a los cuidados:
  • Es recomendable dejar en remojo la plancha de vez en cuando. Según ese sitio y otros que lei, la humedad es muy buena para las planchas. Para remojarla hay que ponerla en una bañera o batea o lugar donde quede plana y dejar en remojo por 15 o 20 minutos en una mezcla de 1/4 taza de vinagre blanco por cada 5 litros de agua fria o ambiente. Despues limpiar la plancha con jabon blanco y un cepillo suave para sacar los restos de tela de los cortes.
  • No hay que doblar la plancha ni exponerla al sol ni al calor, ni hablar de apoyar algo caliente como una  plancha... de planchar o la pava y el mate :p (solo para los entendidos de Sudamerica)
  • Si la plancha de corte tiene olor, dejarla en remojo con una solucion de vinagre blanco y agua, enjuagarla y secar con una toalla. Repetir si es necesario.
  • Y finalmente una buena manera de guardala es abajo del colchon o la cama o en algun lugar donde no se doble. Yo la guardo sobre la puerta del ropero siempre viendo que no se doble porque lei que cuando se dobla demasiado no hay vuelta atras.
Y de esta critica donde se habla mucho de la experiencia de quien lo escribio con la plancha ademas de otros detalles, puedo destacar el hecho de que inmediatamente despues de cortar, hay que pasar la mano para sacar los restos de tela, yo hago eso instintivamente aunque siempre quedan restos chiquitos y me molesta demasiado.
No se si es porque no tengo experiencia o no se, o nadie habla de como sacarlos porque es demasiado común pero esto es lo que intente para sacar esos pedacitos de tela.✰

 I'm not sure if I'm so inexperienced with the tools or nobody talks about that problem in depth because is way too common but here is my experience getting rid of those fibers.
 So on the weekend after I cut the pieces for the purple shrug, I saw a lot of jersey lint in the cuts, so I decided to test what I read.

 I grabbed a glass of water and wet the surface, not a lot, just where the cuts where, then I massaged it a little bit and left it to absorb just a few minutes, then I grabbed an old teeth brush and started to brush the fibers, some came out but still there were a lot of it.
 Then I dried the surface with a towel, and after a few minutes of staring at the mat and thinking: "I will never be able to make a patchwork blanket", something came to mind, I had read an article about cleaning a paper cutting mat and it said something about using tape, it was genius!, so I tried... and it totally worked!

 ✰Agarre un vaso de agua y moje la superficie donde estaban los cortes, masajee un poco y deje que absorba un par de minutos, después cepille los cortes con un cepillo de dientes viejo y salieron un poco de hilos, pero igual seguia quedando bastante. Seque la plancha con una toalla y despues de pensar un rato, me acorde que habia leido algo sobre usar cinta adhesiva para limpiar pedacitos de papel de una plancha de corte para papel tipo guillotina. Probe y funciono bastante bien!
 It is just like waxing lol, just cut a strip of tape, tape it, scratch where the lint is and lift it off quickly!

Tal cual depilación tradicional :p, hay que cortar un pedacito de cinta, pegarlo, raspar para que los hilos se peguen bien y dar el tiron!
I use the same strip to keep lifting off until the lint doesn't get stuck anymore and that is it, cutting mat like new! Such a relief, thought I was really bad at cutting in this.

Salen bastante bien, use varias veces la cinta hasta que no se pegaron mas hilachas y asi repeti hasta que quedo como nueva... un alivio, ya me sentia frustada con esto de cortar con estas herramientas y eso que todavia no hice patchwork.

Thought I could share this just in case there is another worried noobie out there.


Photobucket

Tuesday, May 31

Smok

 Last week I started and (kind of) finished this lovely dragon from Lucy Ravenscar's blog
 I found her previous free dragon on craftster last year but I frogged the project because I chose cotton and somehow the body was little and the legs were huge :/, so this year I saw she updated the pattern so I gave it a try... and here he is, still eyeless/earless... for some reason I just don't get how to finish the ears, it looks so simple but I think I'm just over thinking the deal.
 I decided to crochet claws instead of embroidering, I think it gaves the leg more balance. I looked up images of dragon's legs and images of other's people dragon designs, but they are either embroidered, too complicated or for sale so, not what I'm looking for now lol.
 I just somehow repeated the spike pattern in a smaller size, it doesn't look like... dragon claws, more like duck feet but oh well, everything cannot look always real (I actually have a ... problem with this, I should crochet a pink elephant or a purple pig with wings to get a bit out of my "realistic box" :p)

 Anyways back to the claws, I did this:

Hope this make sense. 
I found the middle st (where I wanted the bigger claw to be) in the 3rd row of the leg, and in the 3rd st to the right I worked:
Small claw: {ch 2, sc into 2nd ch from hook, ss into next base st},
Bigger claw: {ch 3, sc into 2nd ch from hook, hdc into 3rd ch from hook, skip a base st (middle st), ss in next base st},
And again small claw: {ch 2, sc into 2nd ch from hook, ss into next base st and fo}

I worked with a 5mm hook to make the claws of the back legs (same I used to crochet the whole thing, body, wings, etc) and changed to a 3 mm hook to make the claws of the front legs.

I like how they look now, I think the dragon looks cuter with these claws, and of course it will be cuter with ears and eyes :p

Smok's legs with claws
Smok
{scratch my belly, please :3}
Photobucket

Tuesday, February 22

Nice purples but I want GRAY

I had this design for a top for a while and finally I decided to make the pattern in the weekend, cut the pieces and the next step was to dye a couple of pieces of the garment, I had this sort of white cotton ribbon for a few years, it was part of another project that I'm still not sure about but anyway... I wanted to dye the ribbon gray... the color of the jersey fabric I had cut for the body... but oh surprise, the simple step become the hardest one, I didn't know dying gray was such a pain!

No tengo muchas ganas de traducir todo pero para hacerla mas corta, capaz que a alguien le sirva, estoy haciendo una remera con modal gris y quise agregarle unas tiras de puntilla de algodon, pero antes las tenia que teñir del mismo tono gris o parecido, un paso muy simple... pero no tanto, estos son los resultados:

Here is my experiment:
El que quiera gris...

  • In n°1 I dyed the ribbon with pearl gray dye... it became lilac.// La tira n° 1 esta teñina con anilina gris perla... se puso lila.
  • In n°2 I dyed n°1 with the double of pearl gray dye... and it became purple, which is not a big loss because I happen to have almost the same tone in jersey fabric in my stash so a project with this purple ribbon may come up in the future.// A la n°2 le puse el doble de anilina gris perla y se puso violeta oscuro.
  • In n°3, the camera can't take it well but it's lavender which I got mixing dark gray and black dye. // En la n°3 no se nota tanto por la camara pero teñi la tira con una mezcla de anilina gris oscuro y negro y me dio un color lavanda.
  • N° 4 is tinted with black dye... turned dark purple... still purple. And I started to freak out, how is it possible that you get purple dyeing a white fabric with gray dye?!, so I looked it up on the mighty internet, and I found this and they are right, when I was washing one of the containers I saw some magenta tint in it, it made total sense, before looking it up I thought about adding yellow to the purples, but oh well, I went to buy green dye and tried again from scratch. // La n°4 está teñida con anilina negra... se puso violeta más oscuro que la tira n°2 y ahi es cuando ya no aguante más y me puse a buscar en internet la razon por la que cuando teñis algo de gris se pone lila, no encontre nada convincente en español pero encontré esto en inglés, basicamente hablan de que la anilina negra tiene tintes rojos y es por eso que se pone violeta la mezcla cuando se diluye y para opacar el rojo, se usa verde porque es el opuesto entonces empecé de cero de nuevo.
  • 5 is a mix of pearl gray and nile green in equal parts, it turned out a really nice gray-greenish color, it wasn't total gray but I liked the tone. Before trying this, my gut told me my jersey fabric looked kinda green next to the purples for some reason. // La tira 5 está teñida con una mezcla de gris perla y verde nilo en cantidades iguales con poca agua, me gusto el color, un poco verde pero esta a tono de la tela que tengo.
  • N°6 is n°4 dyed with the mix of n°5 and turned out to be less greenish. // La n°6 es un pedazo de la tira n°4 teñida con la mezcla del n°5 y el color fue un poco menos verdoso.
  • And finally n°7 is n°5 dye mix but diluted in more water... water makes a big difference, so that's my tone, I let that strip in the dye half the time recommended so the final tone will be darker, I like the way it looks with the jersey, so the final strips are dyeing in that mix now and I will have to wait to see what happens. // Y por último la n°7 es la mezcla del n°5 pero diluida en más agua... yo ni sabia pero la cantidad de agua es muy importante, Ahora me doy cuenta que capaz que las primeras salieron violetas porque estaban muy diluidas las mezclas de anilina pero igual, me gusta este tono final aunque está muy claro porque no lo deje teñir mucho tiempo, el tono final va a ser más oscuro. Para finalizar, si tu gris queda violeta... agregale verde!
Conclusion: to get gray, add green!


Photobucket

Sunday, September 26

Stormy Spring and what a big difference a beak makes - Birds project part 1

It's been like that since Spring started here last 21st :D, I couldn't take a pic when it hailed (is it that the correct form of the verb?) though but I like these days... I honestly thought it was going to be all hot and humid and people kissing everywhere... but it's not that bad, thanks to these rainy days, cheesy people are inside their houses and I don't have to see them! Other than that, I've been with an annoying cold, changing weather is a killer.

I've made a big improve on the mother's day project, I knitted these 2 birdies in a few hours  the other day, and then I added details. For a moment I was a little... uhm disappointed about how the yellow birdie turned out, well both of them don't look like the original, their heads are not that round, my guess is because of: the yarn or the needles or the filling and/or my hands since it's my first time with double pointed needles.
But back to the yellow one... it looked so weird and while I was staring at it with a blank face, my brother came and said: "hey, what are you making?"; "a bird", I answered; "...."; "exactly, it doesn't look like a bird!", I said, and then he pointed out the obvious: "uhm maybe with a beak and eyes...".

Going from weirdo to bird with just a beak. 
[Interesting language mistake: I actually wrote peak a few times because my head is translating from Spanish, peak means pico in Spanish and pico means, both peak and beak, I wonder what the relation is, if there is any, I guess it's like book and cook, no relation]

For the beaks I used these wooden sticks people use to eat chinese food (I'm not fond of oriental food but my brother and his gf truly are, there were tons of this sticks in a kitchen drawer!). To make the orange bird beak I carved one taking off the angles and then I used water with a bit of brown paint to tint the other beak, which I carved too and then sanded to make it smoother. For the eyes I used little black beads.

To make the feet I used aluminium wire because I have no chance of going outside and look for the kind of branches the original birds feet are made of and also I wanted something I could easily bend because of what's coming next. So I used round pliers and cut 3 pieces and then twisted them, I also cut a 4th one with a smaller curl (uh how do you call that "curl" made with a round plier?) to make the foot look more real, and also because I wanted to give the bird more balance. Lastly I made a final loop/curl so when I apply the white glue it'd stay in that hole and stick better to the filling.
In some kind of light bulb moment, I had the idea of making a stand for the birds, and then the ideas began to flash. So I went to this flower shop I have like a block away,  and I bought a piece (more like a slice) of log, a little basket that it's perfect to make a nest and moss to cover the glue later on.
I glued with hot glue a piece of black felt to the base of the log and I had my brother drilled 2 "holes" so then I could stick there 2 sticks and then glue on them 2 pieces more, all made of awesome chinese food sticks tinted with the watery brown paint, I glued those 2 pieces so that there would be a gap, so the 4th leg of the foot could get in there and the bird could stand on its own.
On the pic there is another stick glued to the log, I'm not sure if I'm keeping that, it's still beta :p
Also there's the fabric I'm going to use to make a cloth for the nest, which it's going to be used to hold sweets or jewelry whatever my mom wants to use it for.
I still need to sew the yellow birdie's eyes. For some reason the orange one looks "birdier" than the yellow but maybe it's just me.

Photobucket

Sunday, March 7

Problem Solved

So, I solved the rug "problem", I had to unravel it, and do it my way, I made that one (the first one) following some instructions from an old magazine but... as I was making it, and clearly I could see, it didn't turn out well, so... I began to crochet it again following what I once read, something like: "if it curls, you need to increase, if it forms a wave, you need to stop increasing". And I also cut the white striped "yarn" in half, that way it was almost the same size as the blue one, that way I saved yarn and the result was better.

So it turned out almost perfect:

 Packed and ready to give it to my sister-in law... who actually loved it, I was so glad it turned out as I wanted it to be, it made my day.
Here is the graphic I used at first, I found it in an old magazine, the rug on the article was made with fabric strips and a mix of cotton yarn, which is not a bad idea, but I'll stick only to "fabric yarn" in the meantime.
Oh and I also found out how much yarn you get with a yard of fabric... less than 500 grams, so I don't think it's worth to buy and cut (I used this method), unless I buy it by weight on the sale area, but they don't always have good colors, and I was also looking forward to buy the fabric yarn from another city cos it's cheaper (1 kg = $10 and here is 1 kg = $13) but I lose when it comes about sending it, it was like $50 to send 6 kgs :/ so no way, I'll stick to the "sometimes" boring colors of the craft supply store.

Photobucket
Related Posts Plugin for WordPress, Blogger...